Character movement that serves gameplay is a crucial feature to get right for any game, but it’s also highly dependent on the type of game that you’re designing. For example, the primary mechanic of Getting Over It is character movement - the tough controls combined with the unrelenting landscape give the game its distinctive ‘feel’. ‘Feel’ is difficult to define, but to me it’s the emotions the designer wants the player to experience. This is affected by everything - ranging from how the UI is laid out to how deep the lore of the world is, so it’s too much to fit into one blog post. I will just look at this one aspect, character movement, here.
What good Character Movement looks like:
More often than not, the purpose of character movement is to serve a higher gameplay goal, such as exploration or combat. If the player wants to fight the next boss, the avatar should obey with a minimum of fuss. We can easily create frustrating mechanics if we get carried away adding layers upon layers of complexity, such as combining the need to perfectly time jumps, climb a wall by manually finding handholds, dodge bullets at the same time as fighting an enemy 10 times your size (Come to think of it, there’s probably some players who would enjoy that challenge, but you must know your audience).
I created two different movement systems centred around two different techniques, Root Motion and Physics-based. You can see and feel the difference in two versions of my demo level (Root Motion and Physics-based ).

Using Root Motion animations for realism:
For my game NinePointEight, I was convinced that the best way to get realistic character movement was with a technique called Root Motion. This works by baking into the animations how the character will move. The software (in my case UE4, but Unity and Godot etc do the same thing) extracts the position and rotation of the Root Bone (the bone that the entire skeleton inherits from) and applies it to the physical representation of the player, usually a capsule. This has the advantage of no foot sliding out of the box, because the animator or Motion Capture software has recorded the animation with perfect lateral movement already.
The animation controller with this technique takes the player intent, such as direction and speed variables, and translates that into an animation to play. The animation then drives the character movement directly, which means the animations always match what the avatar is doing. However, the downside to this is that the animations might not match the player intent perfectly. The animations are blended and interpolated together to get a smooth transition between states, which can lead to a significant lag between input and action. This is compounded by the fact that if you use Motion Capture animations, the momentum of the actor in the suit is built into the animation movement, and therefore the character movement.
Let’s talk about what it means to be ‘realistic’. ‘Realistic’ animation mirrors the physics of how real people move under the constraints of living in a universe where momentum and energy are conserved. In essence, this means that the lag artefact makes the character more realistic; if you think about it, when you’re running full pelt and you want to stop, you need a significant amount of distance to slow down, a distance that might have you hurtling off the edge of a platform in a video game.
This is why the character movement is so tightly connected to the gameplay you’re trying to create. I created this intricate level with many different moving platforms, but my character would take several extra steps after I let go of the control stick. The level had large distances to traverse with quite a few obstacles, so the low acceleration of the starting animations made the character feel sluggish and unresponsive. There wasn’t any control over this; I couldn’t bump up the acceleration because that was entirely controlled by the animation, and I don’t have the animation chops to go in and tinker with them. Even if I did, I would have hideous iteration times. All in the name of no foot sliding… is it really worth it?
I conducted some intensive ‘market research’, which consisted of watching and playing quite a few games, from Dark Souls to Breath of the Wild. I also asked some friends to give their first impressions of my demo, and most said it was sluggish and unresponsive. This was disheartening, as I had spent a not-insignificant amount of time building the demo. However, I collected some very useful data, which I couldn’t have found without going through this process. Do people care about foot sliding? No, especially on transitions. I came to find I didn’t mind either. All I wanted to do was turn on a dime when I felt like it, and stop precariously close to the edge of a cliff. This was consistent with professional games and with the reaction to my demo, so I needed a new gameplan.
The flip side - Breaking the laws of physics:
In order for a truly responsive experience, we need to break some rules. We need high acceleration and high friction, so we spend most of our time at maximum speed. These are purely physical parameters that require tweaking, so we’ll need to move away from animation-driven motion. This is the standard, ‘easy’ and ‘default’ method of game character animation - The input directly drives the character movement, and the animations attempt to make the motion plausible. In essence, it’s to hide the fact the character is only a sliding birdcage:
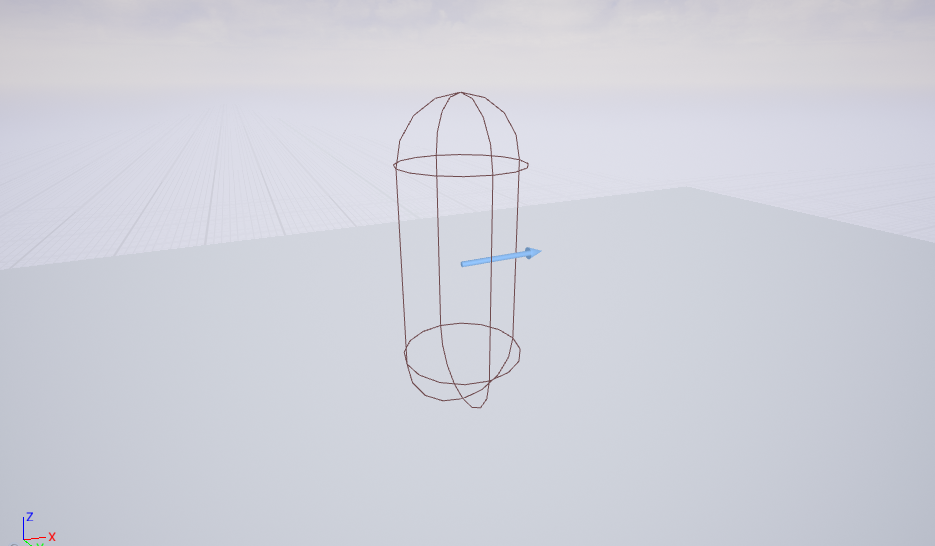
This capsule is what actually moves through the world, colliding with walls and falling off ledges. It’s a very quick calculation to check if a capsule intersects with anything, and usually, we don’t need the extra detail from the actual character mesh. But, the player doesn’t see the capsule, they see the character, so we need to animate that visible mesh to make the player believe the motion they’re seeing. In other words, the animation speed must match the capsule speed, to a good enough approximation.
Using an Animation Modifier to extract the animation speed:
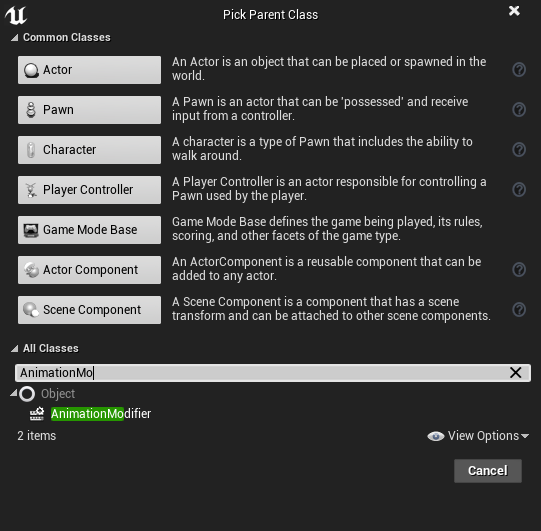
To make this animation believable to the player, we need to find out what speed the primary locomotion animations are. I’m making a movement system that orients towards the direction the player is moving, so the animations I’ll mostly be using are WalkFwd, RunFwd and SprintFwd. You can just eyeball it by guessing different speeds and checking if it slides all over the place, but there’s an easier and more accurate way: Animation Modifiers. In this case, it’s a misnomer because we won’t be modifying the animation, just extracting the average speed. To start with, you need to create a Blueprint of Subclass AnimationModifier:
Then, add an OnApply event, and fill in this blueprint:
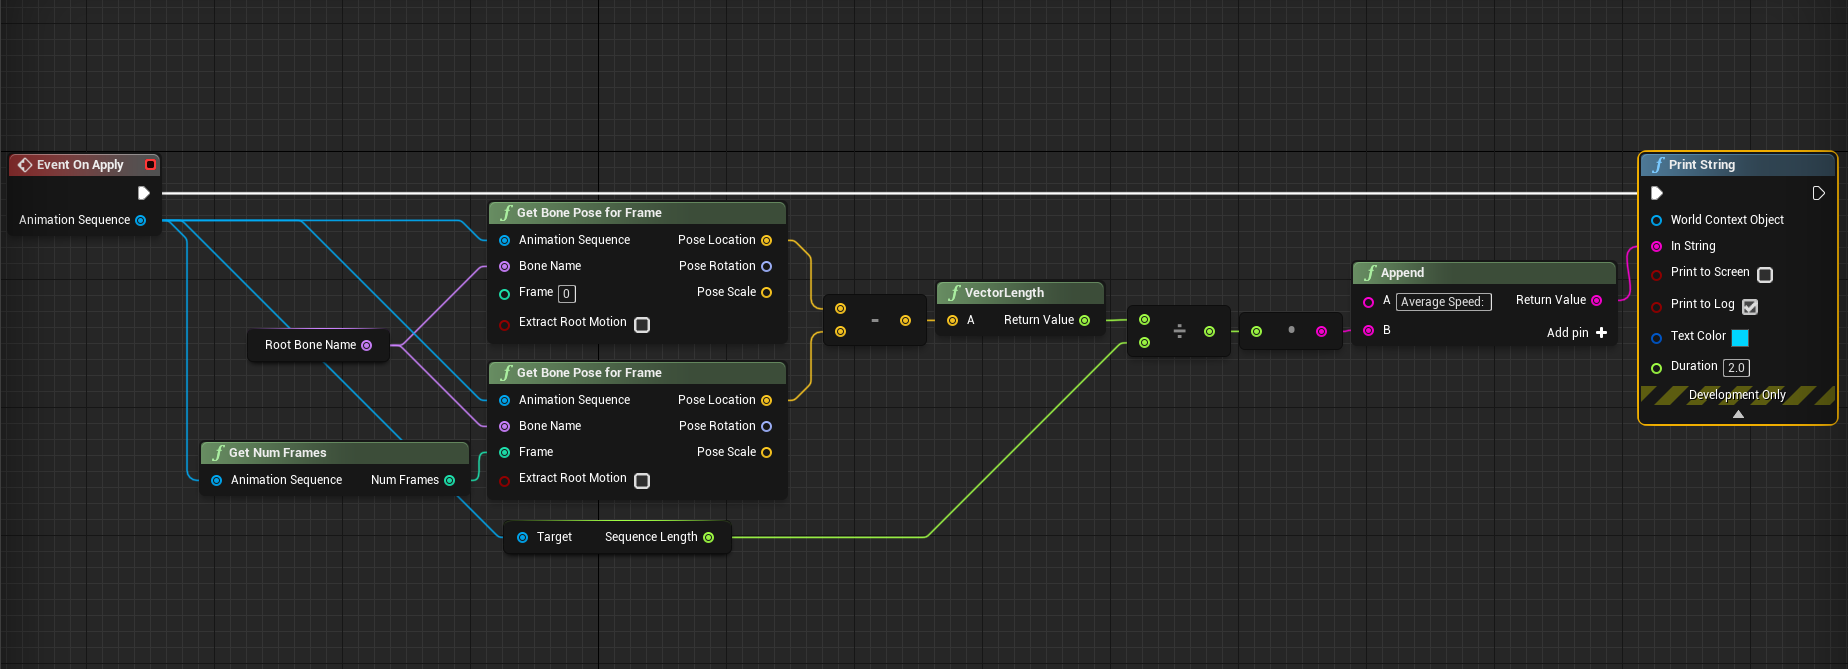
I used a FName variable called RootBoneName with default value ‘root’ to generalise to the case of finding the average speed of any bone in the skeleton, but we only need the root bone speed.
This modifier will only work on Root Motion animations because it takes the difference between the initial and final positions of the root bone and dividing by the total time of the animation (You can still use normal in-place animations for actually animating the character though). If you don’t use Root Motion animations the speed will be zero, not particularly helpful.
To use this freshly minted code, go to a root motion animation and open the Animation Modifiers window:
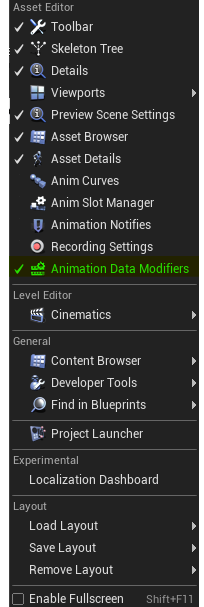
Click Add Modifier and Apply All Modifiers. If you then check the output log you’ll find the average speed of the animation. Too easy!
Note that this function returns the average speed not the maximum speed. However, in the case of animation loops they should be the same because they have a constant speed. If you need to verify this you can plot the position of the root bone using an animation float curve (if it’s a straight line you’re fine), but that’s a bit too complicated for this post.
Making nice transitions with a Blendspace:
Once you’ve recorded the speeds for the different animation loops you’re using, you can create a Blendspace that reflects that. For me, my calculated speeds are:
WalkFwd: 175cm/s
RunFwd: 380 cm/s
SprintFwd: 650 cm/s
This means my Blendspace has a Speed input, ranging from 0 to 650:
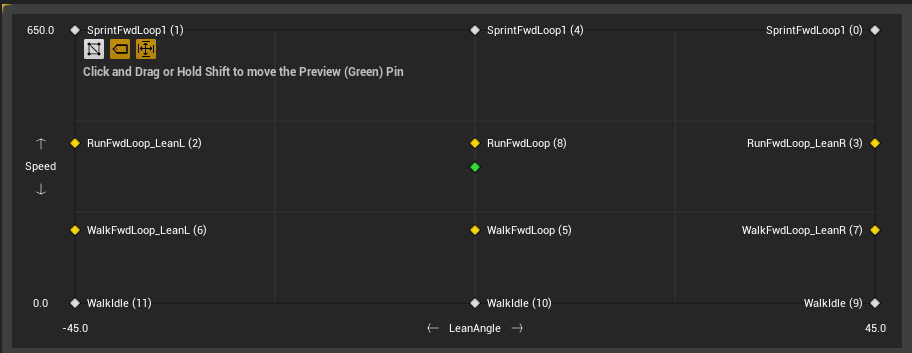
The inclusion of Lean animations is purely aesthetic - they don’t affect the speed. In order to exactly match up the animations with their corresponding speed, I needed to uncheck the ‘Snap to Grid’ option for each animation. The WalkIdle animation is special as well; when the WalkFwdLoop is blended with a normal Idle animation, because Idle is much longer than WalkFwdLoop the walking slows down considerably, messing up our careful calculations. Therefore I created WalkIdle, which is the first frame of Idle duplicated enough times to be the same length as WalkFwdLoop.
Feeding this Blendspace is the raw velocity of the character, ie
Speed = Character->Velocity.Size();
This velocity is determined by the MaxAcceleration and MaxWalkSpeed of the CharacterMovementComponent. To be clear, MaxWalkSpeed is updated for every moving state (walking, running, sprinting), because it relates to the ground movement mode.
The MaxAcceleration is determined by the start and stop animations, but the MaxWalkSpeed is updated by the player input. For keyboard input, I skipped the walking speed and set MaxWalkSpeed to 380cm/s by default, bumping it to 650cm/s when the player holds the shift key. The Blendspace Speed axis has an interpolation value of 1.5 so the animation doesn’t ‘pop’ suddenly.
For analog thumbstick control I just mapped the magnitude of the input from 0 to 0.65 onto a speed of 0 to 175, and 0.65 to 1 onto 175 to 380, with a separate button for sprinting. In combination with the WalkIdle trick above this gives a lot of granularity to a player with a controller
These measures ensure that the animations come very close to perfectly matching up with the ground when the player is moving…
… in a straight line. When the player starts moving it’s still slide city. We still have work to do on the non-linear transition animations, the starting and stopping animations.
Ideally, we want to match up the physical acceleration (MaxAcceleration) to the animation acceleration, but it’s a lot harder to extract this acceleration. As such, I found it’s easier to eyeball it. For the RunFwdStart I found a MaxAcceleration value of 520cm/s2 worked quite well. If you have different angle start animations, say RunFwdStart[90,135,180], then the angle to play is the angle between the current player forward and the input direction.
Lining up the animation rotation with the player rotation was the most difficult part, but I found that interpolating the rotation cubically gave the best results. But at this point it’s all down to trial and error based on your individual animations and game, so just keep tweaking until you’re happy with it.
The stopping animations were very easy, as I cheated a fair bit. I wanted to be able to stop very suddenly, so all I needed to do was bump up the GroundFriction value in the CharacterMovementComponent and play a quick stop animation. If you give the transitions plenty of blend time, you can get away with just playing a RunFwdStop or similar from halfway through.
Integrating with my gravity system:
I spent quite a lot of time trying to integrate the character animation system with the existing gravity mechanics. The problem is that in vanilla UE4, there is always a way to orient the player camera relative to the front of the world. The character capsule rotates in the world Z direction to face the direction they’re moving, and the camera needs to maintain its rotation to the character. The camera then requires an outside reference frame to know where to place itself. In my gravity system, however, the character is rotated to face the gravity source they are currently affected by, such as a spherical planet.
To solve this, I knew I needed to find a way to deterministically calculate an orientation of the player from only a gravity direction. The orientation also needed to be continuous between gravity directions, so the camera maintains its rotation relative to the gravity direction.
Finding the shortest rotation quaternion between the global down and the player’s down is deterministic, but not continuous in the way I’m looking for. When the axis of rotation around which the player rotates changes, the camera orientation is no longer conserved. It seemed that there wasn’t any way to calculate it from scratch, but that it needed to be updated every time the gravity changed.
I managed to solve this problem by creating a quaternion called Swing, which only encodes the orientation of the player due to gravity, not the orientation of the player due to rotating towards its movement. The actual player orientation is a combination of this Swing quaternion with a Twist quaternion, which only encodes the rotation towards its movement. By separating out these components, the Swing quat becomes the coordinate system that the camera relies on.
Swing is only updated when the gravity changes, like so:
| |
This idea is named after the Swing-Twist decomposition of a Quaternion around a given axis. It works differently due to camera constraints, but the visual picture is the same.
Let me know if you’ve programmed a character animation system! I’m interested in the different approaches you come up with to solve these problems.